

Have you ever come across a website with a fluidly animated preloader that drew you in and grabbed your interest from the first glance? It made you want to reload the page over and over again.
Last week, while browsing the internet, I came across Enyata's website, and after seeing the preloader, I was pretty impressed, so I thought, "Why not develop it out?" And that's exactly what I did.
In this article, I'll show you how to use the timeline feature of the Greensock Animation Platform (GSAP), and at the end, you'll be able to make this preloader.
Let's get started!
Prerequisites
This article assumes that you have:
- Basic understanding of HTML and CSS
- Basic understanding of Javascript
- A code editor (VS Code recommended)
- A web browser (Chrome or Firefox recommended)
What is GSAP?
The Greensock Animation Platform (GSAP) is arguably one of the best animation libraries for the web because it enables you to animate just about anything that can be accessed with JavaScript, including DOM Elements, SVGs, generic objects, canvases, and more.
GSAP is also a great choice because it is:
flexible
lightweight
fast, like really fast (estimated to be 20x faster than jQuery),
has a large and supportive community via the forums.
You can learn more about this library here.
Tweens and Timelines
In GSAP, a Tween is a Javascript object that allows you to define parameters that control how animation plays out. Tweens works in such a way that you provide the properties in the format:
gsap.method(element, var, duration)
A Timeline is a tool that allows you to chain together multiple animations (i.e Tweens, and other timelines by nesting ) which makes it easy to control the animations as a whole, and to precisely set their timing. A typical timeline is written like so:
let tl = gsap.timeline();
We would be looking into the most commonly used methods to create Tweens:
to()
from()
fromTo()
to()
This is the most common method in GSAP, as it allows you to define the destination values. Just as its name implies, it specifies where your animation is going to .
from()
The from() method acts like a backwards tween, where you set where the values should start from, and then GSAP animates to the element’s current values.
fromTo()
The fromTo() is really great because it allows us to define both the Start and End values for animations, just as shown in the demo below:
There are many other methods listed in the documentation, but we would be working with these three.
Now that we've learned the basics of Tweens and Timelines, let's build out the preloader!
Building out the preloader
Yay! The time we've all been waiting for is here. In this section, we will build a very simple landing page with HTML and CSS, build the preloader, and use the GSAP timeline to animate the elements.
This section has been broken into different steps to make it easier to understand.
Step 1: Install GSAP
First, to use GSAP in a project, we would have to install it. Luckily, there are different methods to do so.
Using the CDN
You can easily set up GSAP into your project by adding the following to your HTML file:
<script src="https://cdnjs.cloudflare.com/ajax/libs/gsap/3.9.1/gsap.min.js"></script>
Installing via Package managers
//Using npm
npm install gsap

//or with yarn
yarn add gsap
Now that it's installed, then import it into your project
import { gsap } from "gsap";
Step 2: Creating the landing page
We'll start by creating an HTML page with 2 divs — one, the
preloader
div, and the other will be the landing page.
Inside the preloader div, we have a div with a class prl-logo which is the logo on the preloader, and it contains an h1 which would be hidden until it is defined later in the animation sequence.
The SVG element is the menu button in the navigation bar.
<body>
<!-- Intro -->
<div class="preloader">
<div class="prl-logo">
<h1 class="hide"> cruise. ™ </h1>
</div>
<div class="lightCyan-slider"></div>
<div class="persianGreen-slider"></div>
<div class="white-slider"></div>
</div>
<!--Hero-->
<section>
<nav>
<a class="logo" href="index.html">Cruise.</a>
<svg
class="menu-btn"
xmlns="http://www.w3.org/2000/svg"
viewBox="0 0 24 24"
width="24"
height="24"
>
<path fill="none" d="M0 0h24v24H0z" />
<path
d="M3 4h18v2H3V4zm0 7h12v2H3v-2zm0 7h18v2H3v-2z"
fill="rgba(255,255,255,1)"
/>
</svg>
</nav>
<div class="hero-content">
<h2>Lets go on an adventure.</h2>
<p
>Lorem ipsum dolor sit amet consectetur adipisicing elit. Dolorem
culpa vero quae perferendis molestiae exercitationem nemo atque
veritatis ratione rem dolore quibusdam quia, a totam quidem nostrum
iusto! Reiciendis, rem.</p
>
<button>Explore</button>
</div>
</section>
<script src="app.js"></script>
</body>
Now, for the CSS, we have some basic styling, using flex and position to manipulate the layout and positioning of the elements.
You can also get the fonts I used from Google Fonts — Make sure to import them either in the head tag of your HTML file or in your CSS file.
For the preloader section and the sliders, we'll give them a position of fixed so that we can set the top and left properties for its positioning, and then the height and width of 100%, so it takes up 100% of the viewport.
To make the landing page responsive on mobile devices, we'll define some media queries too.
* {
  margin: 0;
  padding: 0;
  box-sizing: border-box;
}

body {
  font-family: "Montserrat", sans-serif;
  min-height: 100vh;
  max-width: 100%;
  background: url(home1.jpg) no-repeat center center fixed;
  -webkit-background-size: cover;
  -moz-background-size: cover;
  -o-background-size: cover;
  background-size: cover;
  position: relative;
}

nav {
  display: flex;
  align-items: center;
  justify-content: space-between;
  min-height: 10vh;
  padding: 1rem 5rem;
}

.logo {
  font-family: "Abril Fatface", cursive;
  text-decoration: underline;
  font-size: 1.3rem;
  color: #fff;
  font-weight: lighter;
}

.menu-btn {
  cursor: pointer;
}

.hero-content {
  position: absolute;
  top: 50%;
  left: 50%;
  transform: translate(-50%, -50%);
  width: 60%;
  color: #fff;
  text-align: center;
  z-index: -1;
}
.hero-content h2 {
  font-size: 3rem;
  font-family: "Abril Fatface", cursive;
  font-weight: lighter;
}
.hero-content p {
  font-size: 0.9rem;
  font-family: "Montserrat", sans-serif;
  color: #f0f2f2;
  margin: 1.5rem 0rem;
  line-height: 24px;
}

button {
  border: none;
  outline: none;
  padding: 0.5rem 1.5rem;
  border-radius: 10px;
  color: #025959;
  cursor: pointer;
  margin-top: 1.5rem;
  font-size: 0.9rem;
}

/* Preloader  */
.preloader {
  background: white;
  position: fixed;
  top: 0;
  left: 0;
  width: 100%;
  height: 100%;
  display: flex;
  align-items: center;
  justify-content: center;
}

.prl-logo {
  font-family: "Abril Fatface", cursive;
  font-size: 1.3rem;
  z-index: 2;
}

/* Sliders  */
.lightCyan-slider,
.persianGreen-slider,
.white-slider {
  position: fixed;
  top: 0;
  left: 0;
  width: 100%;
  height: 100%;
  transform: translateX(-100%);
}
.lightCyan-slider {
  background: #d5f2ef;
}

.persianGreen-slider {
  background: #03a6a6;
}

.white-slider {
  background: #fff;
}

.hide {
  opacity: 0;
  color: #03a6a6;
  font-weight: lighter;
}

/* Responsive media queries */
@media screen and (max-width: 768px) {
  .logo,
  .prl-logo {
    font-size: 1rem;
  }
  .hero-content h2 {
    font-size: 2rem;
  }
  .hero-content p {
    font-size: 0.8rem;
  }
}

@media screen and (max-width: 425px) {
  nav {
    padding: 1rem 3rem;
  }
}
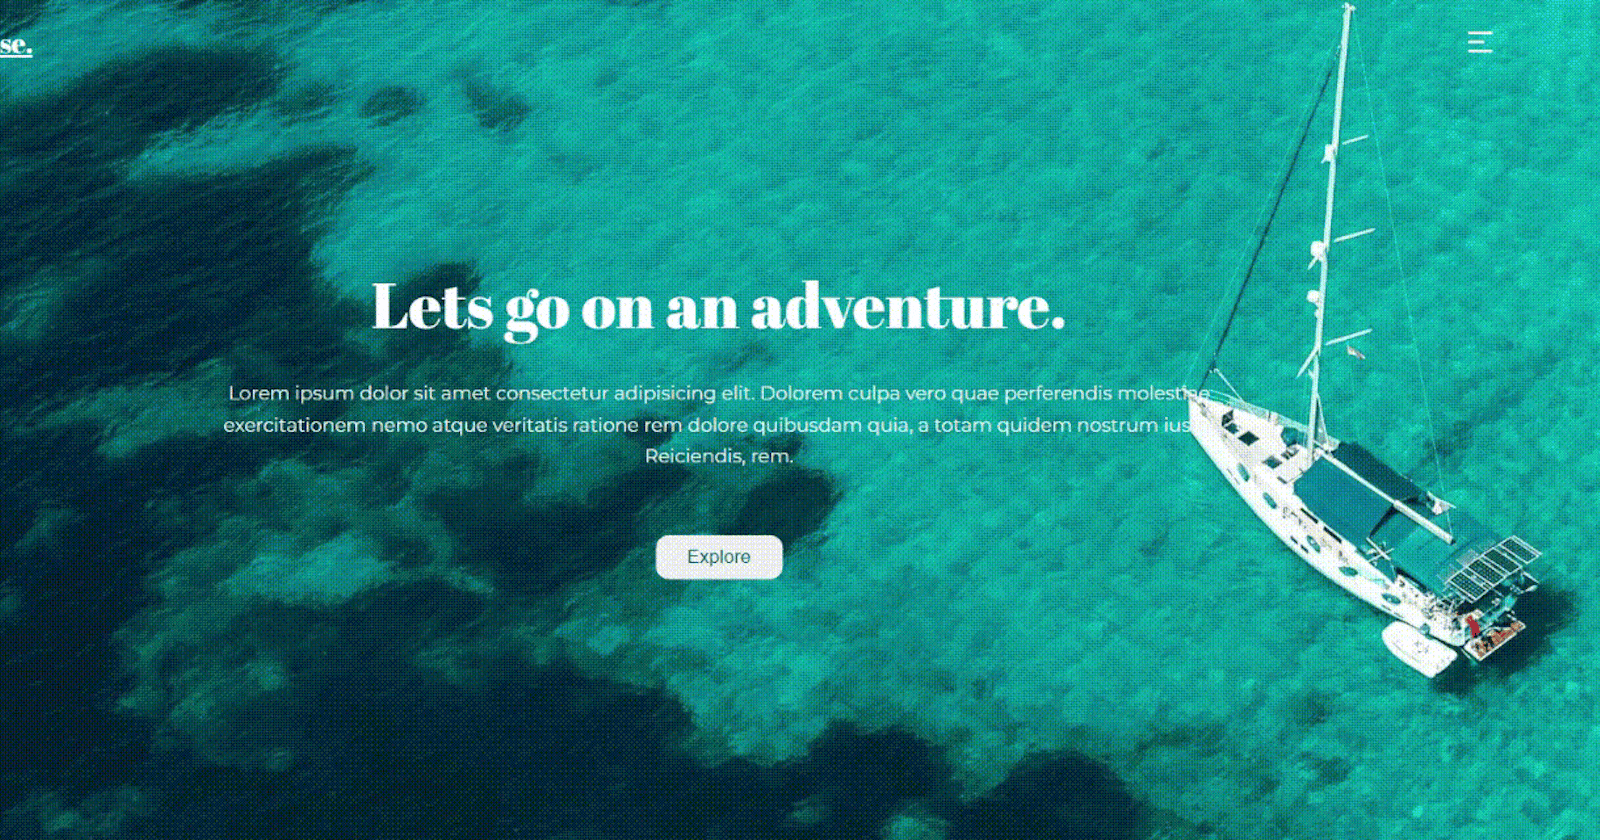
The resulting layout 👇
Great, we have our landing page set up, now let's dive into Javascript and build the animation timeline.
Step 3: Implementing GSAP timeline
We start by creating a timeline, which accepts the defaults property. This lets you set properties that will be inherited by all tweens in that timeline.
In this case, we're setting the ease animation to power1.out.
const tl = gsap.timeline({ defaults: { ease: "power1.out" } });
To define a tween:
Define the target element
Define the vars parameter
Define the position parameter(Note: this is optional)
tl.to(".lightCyan-slider", {
  x: "-10%",
  duration: 1,
});
The code above first takes the element we want to animate( the target element), which in this case is the class lightCyan-slider.
Then, we add the vars parameter, which contains the properties/values you want the tween to have.
In this case, the vars parameter contains the x key which is equivalent to a transform: translateX() in CSS.
To position the animations in the timeline, you'll need to pass the position parameter after the vars parameter. Here it is defined as "-=1", and it is super helpful because it tells the timeline exactly where to insert the animation.
In this case, the animation runs 1 second before the end of the previous animation.
tl.to(
  ".persianGreen-slider",
  {
    x: "-20%",
    duration: 1.5,
  },
  "-=1"
);
To learn more about the position parameter, check here.
Now, we can define the other tweens:
const tl = gsap.timeline({ defaults: { ease: "power1.out" } });

tl.to(".lightCyan-slider", {
  x: "-10%",
  duration: 1,
});

tl.to(
  ".persianGreen-slider",
  {
    x: "-20%",
    duration: 1.5,
  },
  "-=1"
);

tl.to(
  ".white-slider",
  {
    x: "-30%",
    duration: 1.5,
  },
  "-=1"
);

tl.to(".hide", {
  x: "0%",
  duration: 2,
  opacity: 1,
});

tl.to(".preloader", {
  x: "200%",
  duration: 3,
});

tl.fromTo(
  "nav",
  {
    opacity: 0,
  },
  {
    opacity: 1,
    duration: 1,
  },
  "-=2"
);

tl.fromTo(
  ".hero-content",
  {
    opacity: 0,
    y: -20,
  },
  {
    opacity: 1,
    duration: 1,
    y: 0,
  },
  "-=1.5"
);
Note : It is important that you write your tweens in the order that you want the timeline to run.
For example, in the code above, we go from:
.lightCyan-slider --> .persianGreen-slider --> .white-slider --> .hide --> .preloader --> nav -->.hero-content
Great!, we have successfully created a timeline using GSAP that chains all the animations for our landing page, see the result!

Check out the live demo and the code repository on Github.
Conclusion
Congrats!!! If you made it to the end, that means you have successfully implemented the GSAP timeline and built an awesome preloader. I hope you got a lot of value from this article.
I want you to know there are a lot of possibilities in using GSAP and is not limited to preloaders. Check out some of the best GSAP animation websites on awwwards and on Greensock Showcase.
Also, do well to like and follow for more content, and if you've got any questions or spotted any errors... please do well to leave some feedback as this is my first technical article :)