


Learn how React Context API works by Building a Minimal Ecommerce Shopping App


So, this is a project that has been on my mind for a while, but I didn't put much thought or effort into building it.
Then Hashnode's Writeathon came up, and I thought, this is the perfect opportunity to write this article that will both help me improve my React knowledge and also help other developers who are learning about it for the first time or want to brush up on their knowledge of the subject. Win-win situation!
In this article, you'll learn about the React Context API, how it solves prop drilling, and how I built this simple shopping app with the following features:
- Store current items
- Update the context when the user clicks on the "Add to Cart" button
- Display the cart count in the Navigation bar
- Add and remove items from the Cart
- Save cart items to local storage
Below is a screenshot of what we'll be building:
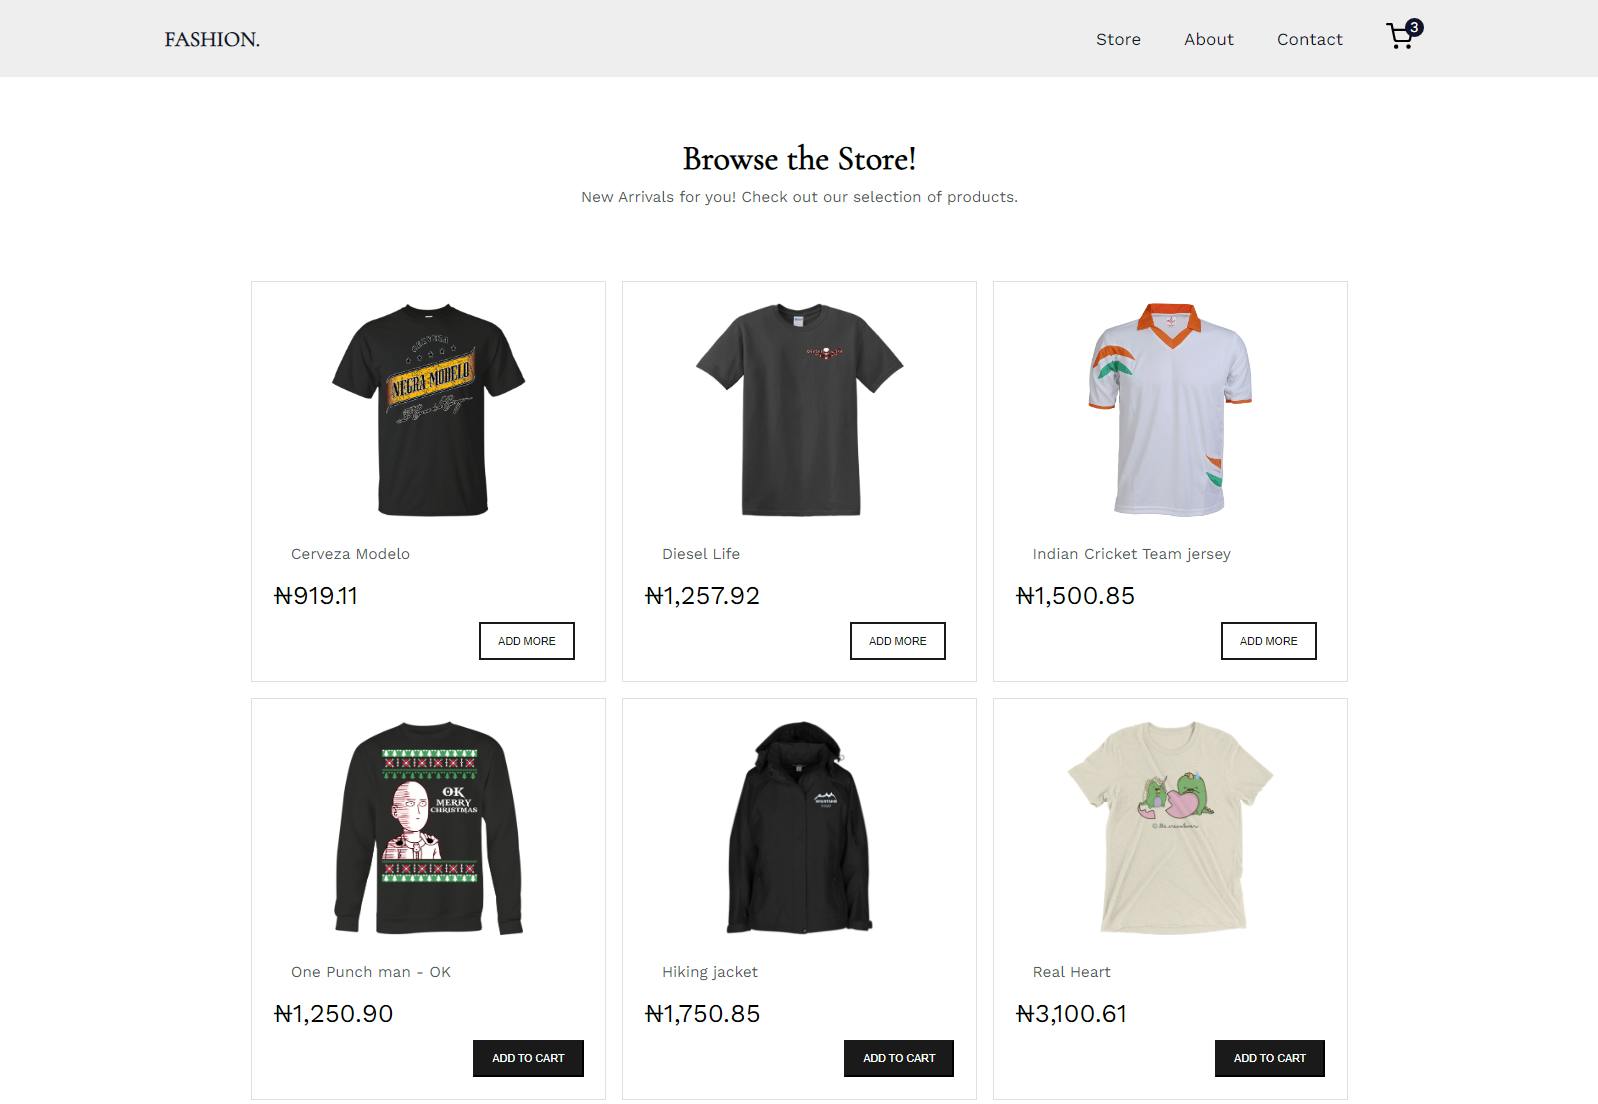
If that looks good, let's get started!
Prerequisites
This article assumes that you have :
- A basic knowledge of HTML, CSS, JavaScript, and React.
- Node and npm installed on your local development machine.
- Code Editor(VS Code)
Overview of React Context
What is React Context?
React Context is a method used to pass data(and functions) from parent to child component(s), by storing the data in a store (similar to Redux), from where you can easily access and import the data into whatever components you choose.
This is a better alternative to prop drilling, which is the term used to describe the passing of data through several layers of components, even if those components have no actual need for the data.
When to use Context?
Context is designed to share data that can be considered "global" to the whole app. An example would be the currently authenticated user, a theme, or user preferences(for example, language or locale).
"Context is primarily used when some data needs to be accessible by many components at different nesting levels. Apply it sparingly because it makes component reuse more difficult."
Source: Official Docs
Building the eCommerce Web app
Illustrations
Before we get into the code, let’s look at the component hierarchy to better understand the relationship between the components of the app.
The illustration below shows how data will be passed down from the root component level (App) to the component rendering what is to be displayed(items).
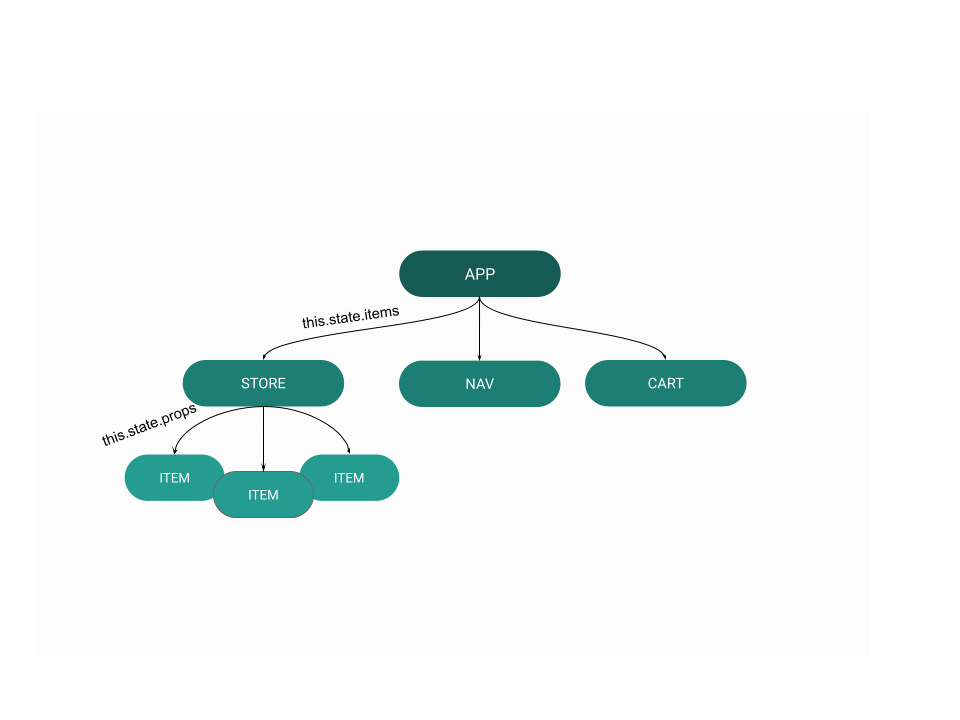
However, what we'll be using in our app is what Context solves:
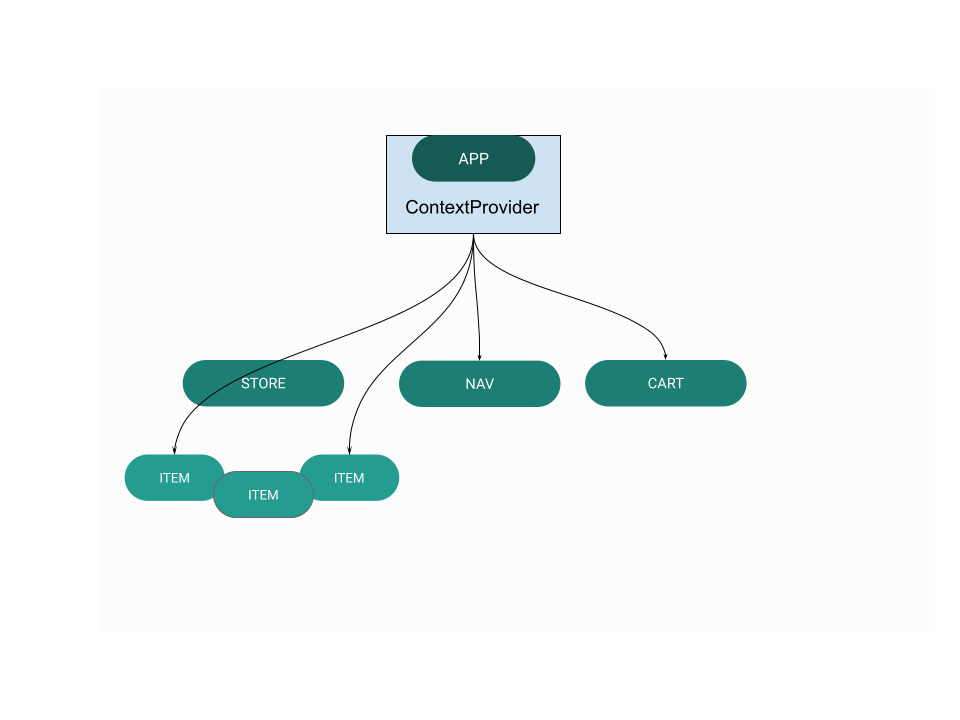
As you can see, the Context is like a store in your application. And once it is set up, you can simply import it into whatever component needs that data.
Now that we have gone through a basic overview of React Context, let's jump right into the project.
Here is the live demo of what we'll be building, and if you also want to see the code, it's available on Github.
Project Set up
Let's start by creating a new React project. I will be using Vite in this tutorial. If you haven't heard about it, do well to check out my previous article on it.
Of course, feel free to use your bundler of choice: Vite or CRA.
# vite
npm init vite@latest react-shopping-cart --template react

# create react app
npx create-react-app react-shopping-cart
Once it is finished, run:
cd react-shopping-cart
npm install
Dependencies we'll be using:
npm install react-router-dom@6
npm install --save styled-components
Note: We won’t be covering the styling to keep our code minimal; this is just to explain how the app works.
Also, I have included some comments in the code so that you understand their purpose.
Context Setup
In complex applications where the need for context is usually necessary, there can be multiple contexts, with each having its data and functions relating to the set of components that requires those data and functions.
For example, there can be a ProductContext for handling the components which use product-related data, and another ProfileContext for handling data related to authentication and user data.
However, for the sake of keeping things as simple as possible, we’ll use just one context instance.
In the src directory, create three folders: Context, components and pages.
Inside the Context folder create another folder, Cart.
Navigate to the Cart folder and add the following to a new file, CartTypes.js.
// /src/Context/Cart/CartTypes.js`:

export const ADD_TO_CART = "ADD_TO_CART";
export const REMOVE_ITEM = "REMOVE_ITEM";
export const INCREASE = "INCREASE";
export const DECREASE = "DECREASE";
export const CHECKOUT = "CHECKOUT";
export const CLEAR = "CLEAR";
Here, we are defining the action types that our Context should have, and exporting them to be used within the Context.
Next, add the following to a new file, CartContext.jsx in the same directory to create the context:
import { createContext } from "react";

const CartContext = createContext();

export default CartContext;
Next, create a new file CartState.jsx inside the Cart folder. Add the following code:
import { useReducer } from "react";
import CartContext from "./CartContext";
import CartReducer from "./CartReducer";
import { sumItems } from "./CartReducer";

const CartState = ({ children }) => {
  //   Initial State of the cart
  const initialState = {
    cartItems: [],
    checkout: false,
  };

  //Set up the reducer
  const [state, dispatch] = useReducer(CartReducer, initialState);

  //Function to handle when an item is added from the store into the Cart
  const addToCart = (payload) => {
    dispatch({ type: "ADD_TO_CART", payload });
  };

  //Function to handle when an item that is in the cart is added again
  const increase = (payload) => {
    dispatch({ type: "INCREASE", payload });
  };

  //Function to handle when an item is removed from the cart
  const decrease = (payload) => {
    dispatch({ type: "DECREASE", payload });
  };

  //Function to remove an item from the cart
  const removeFromCart = (payload) => {
    dispatch({ type: "REMOVE_ITEM", payload });
  };

  //Function to clear the cart
  const clearCart = () => {
    dispatch({ type: "CLEAR" });
  };

  //Function to handle when the user clicks the checkout button
  const handleCheckout = () => {
    dispatch({ type: "CHECKOUT" });
  };

  return (
    //Add the functions that have been defined above into the Context provider, and pass on to the children
    <CartContext.Provider
      value={{
        showCart: state.showCart,
        cartItems: state.cartItems,
        addToCart,
        removeFromCart,
        increase,
        decrease,
        handleCheckout,
        clearCart,
        ...state,
      }}
    >
      {children}
    </CartContext.Provider>
  );
};

export default CartState;
Let's break the above code into bits.
First, the useReducer hook that is imported, accepts a reducer of type (state, dispatch) => newState, which then returns the current state. We also import the context files: CartContext and CartReducer.
Second, the initialItems is an array that defines the initial state of the cart when the page is loaded.
Third, in the CartContext.Provider, will render all of the props passed into it and will pass it through its children.
How the provider works is that the current context value is determined by the value prop of the nearest <CartContext.Provider>, and when it updates, the useContext hook will trigger a rerender with the latest context value passed to the CartContext provider.
Next, create a new file CartReducer.jsx, and add the following code:
// /src/Context/Cart/CartReducer.jsx

//Import the Action types
import {
  REMOVE_ITEM,
  ADD_TO_CART,
  INCREASE,
  DECREASE,
  CHECKOUT,
  CLEAR,
} from "./CartTypes.js";

// Export function to calculate the total price of the cart and the total quantity of the cart
export const sumItems = (cartItems) => {
  Storage(cartItems);
  let itemCount = cartItems.reduce(
    (total, product) => total + product.quantity,
    0
  );
  let total = cartItems
    .reduce((total, product) => total + product.price * product.quantity, 0)
    .toFixed(2);
  return { itemCount, total };
};

// The reducer is listening for an action, which is the type that we defined in the CartTypes.js file
const CartReducer = (state, action) => {
  // The switch statement is checking the type of action that is being passed in
  switch (action.type) {
    // If the action type is ADD_TO_CART, we want to add the item to the cartItems array
    case ADD_TO_CART:
      if (!state.cartItems.find((item) => item.id === action.payload.id)) {
        state.cartItems.push({
          ...action.payload,
          quantity: 1,
        });
      }

      return {
        ...state,
        ...sumItems(state.cartItems),
        cartItems: [...state.cartItems],
      };

    // If the action type is REMOVE_ITEM, we want to remove the item from the cartItems array
    case REMOVE_ITEM:
      return {
        ...state,
        ...sumItems(
          state.cartItems.filter((item) => item.id !== action.payload.id)
        ),
        cartItems: [
          ...state.cartItems.filter((item) => item.id !== action.payload.id),
        ],
      };

    // If the action type is INCREASE, we want to increase the quantity of the particular item in the cartItems array
    case INCREASE:
      state.cartItems[
        state.cartItems.findIndex((item) => item.id === action.payload.id)
      ].quantity++;
      return {
        ...state,
        ...sumItems(state.cartItems),
        cartItems: [...state.cartItems],
      };

    // If the action type is DECREASE, we want to decrease the quantity of the particular item in the cartItems array
    case DECREASE:
      state.cartItems[
        state.cartItems.findIndex((item) => item.id === action.payload.id)
      ].quantity--;
      return {
        ...state,
        ...sumItems(state.cartItems),
        cartItems: [...state.cartItems],
      };

    // If the action type is CHECKOUT, we want to clear the cartItems array and set the checkout to true
    case CHECKOUT:
      return {
        cartItems: [],
        checkout: true,
        ...sumItems([]),
      };

    //If the action type is CLEAR, we want to clear the cartItems array
    case CLEAR:
      return {
        cartItems: [],
        ...sumItems([]),
      };

    //Return the state if the action type is not found
    default:
      return state;
  }
};

export default CartReducer;
Now that we're done setting up the context, the next thing will be to wrap the App inside the Context.
To do that, navigate to the main.jsx(Vite) or index.js(CRA) in the root directory. Add the following code:
import React from "react";
import ReactDOM from "react-dom/client";
import App from "./App";
import "./index.css";
import CartState from "./Context/Cart/CartState";

ReactDOM.createRoot(document.getElementById("root")).render(
  <React.StrictMode>
    <CartState>
      <App />
    </CartState>
  </React.StrictMode>
);
So, now our entire app has access to the Context.
Building out the Components
For the App.jsx, we'll add the code that handles the application’s navigation.
import Navbar from "./components/Navbar";
import Store from "./pages/Store";
import About from "./pages/About";
import { BrowserRouter, Routes, Route } from "react-router-dom";
import Cart from "./pages/Cart";

function App() {
  return (
    <>
      <BrowserRouter>
        <Navbar />
        <Routes>
          <Route path="/" element={<Store />} />
          <Route exact path="/about" element={<About />} />
          <Route exact path="/cart" element={<Cart />} />
        </Routes>
      </BrowserRouter>
    </>
  );
}

export default App;
Now, let's create the components we'll need for our app's basic navigation to function properly.
Create a new file Navbar.jsx inside the components folder, and add the following:
// General
import { useState, useEffect } from "react";
import { Link, NavLink } from "react-router-dom";
import CartIcon from "/assets/icons/cart.svg";
import styled from "styled-components";
import CartContext from "../Context/Cart/CartContext";
import { useContext } from "react";

const Navbar = () => {
  const [toggle, setToggle] = useState(false);
  const [innerWidth, setInnerWidth] = useState(window.innerWidth);

  // Get Screen Size
  useEffect(() => {
    const changeWidth = () => {
      setInnerWidth(window.innerWidth);
    };

    window.addEventListener("resize", changeWidth);

    return () => {
      window.removeEventListener("resize", changeWidth);
    };
  }, []);

  // Extract itemscount from CartContext
  const { cartItems } = useContext(CartContext);

  return (
    <Nav>
      <NavContainer>
        <Left>
          <Link to={"/"}>FASHION.</Link>
        </Left>

        <Right>
          <NavRightContainer
            style={{
              transform:
                innerWidth <= 500
                  ? toggle && "translateY(100vh)"
                  : "translateY(0%)",
            }}
          >
            <NavList>
              <NavItem>
                <NavLink to="/" onClick={() => setToggle(!toggle)}>
                  Store
                </NavLink>
              </NavItem>
              <NavItem>
                <NavLink to="/about" onClick={() => setToggle(!toggle)}>
                  About
                </NavLink>
              </NavItem>
              <NavItem>
                <a href="https://twitter.com/israelmitolu" target="_blank">
                  Contact
                </a>
              </NavItem>
              <NavItem>
                <Link to="/cart" onClick={() => setToggle(!toggle)}>
                  <p>Cart</p>
                  <NavCartItem>
                    <img src={CartIcon} alt="Shopping cart" />
                    {/* If the number of cartItems is greater than 0, display the
                    number of items in the cart */}
                    {cartItems.length > 0 && (
                      <CartCircle>{cartItems.length}</CartCircle>
                    )}
                  </NavCartItem>
                </Link>
              </NavItem>
            </NavList>
          </NavRightContainer>

          <MenuBtn onClick={() => setToggle(!toggle)}>
            <span></span>
            <span></span>
            <span></span>
          </MenuBtn>
        </Right>
      </NavContainer>
    </Nav>
  );
};
The above code sets up the Navigation bar, which will look like this:

In the pages folder, which is in the src directory, create Store.jsx, Cart.jsx and About.jsx.
For the Store.jsx,
import { products } from "../data";
import styled from "styled-components";
import ProductCard from "../components/ProductCard";

const Store = () => {
  return (
    <>
      <Heading>
        <h1>Browse the Store!</h1>
        <p>New Arrivals for you! Check out our selection of products.</p>
      </Heading>
      <ProductsContainer>
        {products.map((product) => (
          <ProductCard key={product.id} product={product} />
        ))}
      </ProductsContainer>
    </>
  );
};

export default Store;
The Store contains the Product Cards, which are generated dynamically by mapping through the available products array which is exported from the data.js file:
export const products = [
  {
    id: 1,
    name: "Cerveza Modelo",
    price: 919.11,
    image: "/assets/img/1.png",
  },
  {
    id: 2,
    name: "Diesel Life",
    price: 1257.92,
    image: "/assets/img/2.png",
  },
  {
    id: 3,
    name: "Indian Cricket Team jersey",
    price: 1500.85,
    image: "/assets/img/3.png",
  },
  {
    id: 4,
    name: "One Punch man - OK",
    price: 1250.9,
    image: "/assets/img/4.png",
  },
  {
    id: 5,
    name: "Hiking jacket",
    price: 1750.85,
    image: "/assets/img/5.png",
  },
  {
    id: 6,
    name: "Real Heart",
    price: 3100.61,
    image: "/assets/img/6.png",
  },
  {
    id: 7,
    name: "Fredd - Black and White",
    price: 1801.1,
    image: "/assets/img/7.png",
  },
  {
    id: 8,
    name: "Star Wars - The Last",
    price: 1199.99,
    image: "/assets/img/8.png",
  },
  {
    id: 9,
    name: "Yellow Blouse",
    price: 2395.16,
    image: "/assets/img/9.png",
  },
  {
    id: 10,
    name: "Rick and Morty - Supreme",
    price: 1243.82,
    image: "/assets/img/10.png",
  },
];
The ProductCard component shows the product details for each product.
Note that we would import useContext and CartContext in all the components where we need the data that is stored in the context.
The onClick events in the buttons handle the addToCart and increase functions which we have extracted from the CartContext:
import styled from "styled-components";
import { Link } from "react-router-dom";
import { formatCurrency } from "../utils";
import CartContext from "../Context/Cart/CartContext";
import { useContext } from "react";

const ProductCard = ({ product }) => {
  // Extract these functions from the CartContext
  const { addToCart, increase, cartItems, sumItems, itemCount } =
    useContext(CartContext);

  //Check whether the product is in the cart or not
  const isInCart = (product) => {
    return !!cartItems.find((item) => item.id === product.id);
  };

  return (
    <CardWrapper>
      <ProductImage
        src={product.image + "?v=" + product.id}
        alt={product.name}
      />
      <ProductName>{product.name}</ProductName>
      <ProductCardPrice>{formatCurrency(product.price)}</ProductCardPrice>
      <ProductCardButtons>
        {isInCart(product) && (
          <ButtonAddMore
            onClick={() => {
              increase(product);
            }}
            className="btn"
          >
            Add More
          </ButtonAddMore>
        )}

        {!isInCart(product) && (
          <Button onClick={() => addToCart(product)}>Add to Cart</Button>
        )}
      </ProductCardButtons>
    </CardWrapper>
  );
};
For the code below, we will extract the state and functions that we need for the Cart component, which are: cartItems, checkout and clearCart.
Then, if there are any items in the cartItems array, render the items as CartItem components to the page:
import CartItem from "../components/CartItem";
import { useContext } from "react";
import CartContext from "../Context/Cart/CartContext";
import styled from "styled-components";
import Checkout from "../components/Checkout";
import { Link } from "react-router-dom";

const Cart = () => {
  // Extract the functions from the Context
  const { cartItems, checkout, clearCart } = useContext(CartContext);

  return (
    <>
      <Heading>
        <h1>
          Shopping Cart
          <span>({cartItems.length})</span>
        </h1>
      </Heading>

      {/* Show the checkout message when the Checkout Button has been clicked */}
      {checkout && (
        <CheckoutMsg>
          <h4>Thank you for your purchase!</h4>
          <p>
            Your order has been placed and will be delivered to you within 24
            hours.
          </p>
          <Link to="/">
            <ShopBtn onClick={clearCart}>Continue Shopping</ShopBtn>
          </Link>
        </CheckoutMsg>
      )}

      <Layout>
        <div>
          {
            <CartItemWrapper>
              {/* If cart is empty, display message, and if not, display each cart
            Item in cart: {cartItems.length} */}
              {cartItems.length === 0 ? (
                <h4 style={{}}>Cart is empty</h4>
              ) : (
                <ul>
                  {cartItems.map((product) => (
                    <CartItem key={product.id} product={product} />
                  ))}
                </ul>
              )}
            </CartItemWrapper>
          }
        </div>

        <div>
          {/* Checkout component  */}
          {cartItems.length > 0 && <Checkout />}
        </div>
      </Layout>
    </>
  );
};
The CartItem component contains the items that are present in the current state. And, we'll extract some functions from the CartContext, namely: removeFromCart, increase and decrease:
import { useContext } from "react";
import CartContext from "../Context/Cart/CartContext";
import styled from "styled-components";
import { formatCurrency } from "../utils";
import TrashIcon from "/assets/icons/trash-outline.svg";
import Plus from "/assets/icons/add-circle-outline.svg";
import Minus from "/assets/icons/remove-circle-outline.svg";

const CartItem = ({ product }) => {
  const { removeFromCart, increase, decrease } = useContext(CartContext);

  return (
    <SingleCartItem>
      <CartImage src={product.image} alt={product.name} />
      <div>
        <h5>{product.name}</h5>
        <p>{formatCurrency(product.price)}</p>
      </div>

      {/* Buttons */}
      <BtnContainer>
        <button
          onClick={() => increase(product)}
          className="btn btn-primary btn-sm mr-2 mb-1"
        >
          <Icon src={Plus} alt="" />
        </button>

        <div>
          <p>Qty: {product.quantity}</p>
        </div>

        {/* Display a minus icon or trash/delete icon based on the quantity of a particular product is in the cart */}
        {product.quantity > 1 && (
          <button onClick={() => decrease(product)} className="btn">
            <Icon src={Minus} alt="" />
          </button>
        )}

        {product.quantity === 1 && (
          <button onClick={() => removeFromCart(product)} className="btn">
            <Icon src={TrashIcon} alt="" />
          </button>
        )}
      </BtnContainer>
    </SingleCartItem>
  );
};
Adding Cart Management
Now that we can add, remove, and display products, the final thing to do is implement our cart management. We have already initialised the cart as an empty array in CartState.jsx, meaning that once we restart the app, it will revert to being empty.
Now, what we will do is make sure that we load the existing cart from the local storage on component load.
Update the initialState method in CartState.jsx as follows:
const initialState = {
  cartItems: storage,
  ...sumItems(storage),
  checkout: false,
};
Next, we need to define the storage, also in the CartContext.jsx:
//Local Storage
const storage = localStorage.getItem("cartItems")
  ? JSON.parse(localStorage.getItem("cartItems"))
  : [];
Finally, in the CartReducer.jsx, we will define Storage:
const Storage = (cartItems) => {
  localStorage.setItem(
    "cartItems",
    JSON.stringify(cartItems.length > 0 ? cartItems : [])
  );
};
And export the function to calculate the total price of the cart and the total quantity of the cart
export const sumItems = (cartItems) => {
  Storage(cartItems);
  let itemCount = cartItems.reduce(
    (total, product) => total + product.quantity,
    0
  );
  let total = cartItems
    .reduce((total, product) => total + product.price * product.quantity, 0)
    .toFixed(2);
  return { itemCount, total };
};
With this, we've successfully completed the implementation of the Shopping App.
Check out the live demo and the code repository on Github.
Conclusion
And we're done!
In the course of this article, we discussed Context and its use and used React to scaffold the interface of a minimal shopping app. We also used context to move data and methods between multiple components and added its functionality using useReducer and dispatch.
If you found this post useful (and I'm sure you did), do well to share this resource with your friends and co-workers, and follow me for more content. If you have a question or find an error or typo, kindly leave your feedback in the comments section.
Thanks for reading, and happy coding!